准备

- zookeeper: https://archive.apache.org/dist/zookeeper/zookeeper-3.4.14/
- kafka: https://www.apache.org/dyn/closer.cgi?path=/kafka/2.2.0/kafka_2.11-2.2.0.tgz
- flume: http://www.apache.org/dyn/closer.lua/flume/1.9.0/apache-flume-1.9.0-bin.tar.gz
- hadoop: https://www.apache.org/dyn/closer.cgi/hadoop/common/hadoop-2.9.2/hadoop-2.9.2.tar.gz
Zookeeper
kafka依赖于zookeeperr进行负载均衡等控制,所以第一步我们安装zookeeper。 编辑zookeeper的配置文件zoo.cfg。
# The number of milliseconds of each tick
tickTime=2000
# The number of ticks that the initial
# synchronization phase can take
initLimit=10
# The number of ticks that can pass between
# sending a request and getting an acknowledgement
syncLimit=5
# the directory where the snapshot is stored.
# do not use /tmp for storage, /tmp here is just
# example sakes.
# zookeeper数据保存位置,自定义自己的保存路径
dataDir=/Users/russ/devtools/zookeeper-3.4.14/data
# the port at which the clients will connect
clientPort=2181
启动zookeeper:
./bin/zkServer.sh start
kafka
kafka的配置流程可以参看https://russxia.github.io/2018/03/23/Java集成Kafka简单步骤.html。两者的版本略有不同,但是大体的步骤和思路是一致的。
这次的目的是测试kafka+flume+hdfs的集成,所以启动单个kafka-server就够了。
## 启动kafka服务
./kafka-server-start.sh ../config/server.properties

## 启动kafka producer,创建'test_topic'名的topic
./bin/kafka-console-producer.sh --broker-list localhost:9092 --sync --topic test_topic

## 启动消费者,标记从头开始消费
./bin/kafka-console-consumer.sh --bootstrap-server localhost:9092 --topic test_topic --from-beginning
如果你在producer中发出的消息,可以在消费者一端看到的话,就说明kafka启动ok了。
新版本(0.9.0以后)consumer的offset等信息不在保存在zookeeper中了,而是保存在Kafka的topic __consumer_offset中,所以启动consumer的参数用的是 --bootstrap-server而不是--zookeeper。也可以看到新版本的kafka-console-consumer.sh不再支持--zookeeper参数,而是必传--bootstrap-server。
./kafka-console-consumer.sh --help
This tool helps to read data from Kafka topics and outputs it to standard output.
Option                                   Description
------                                   -----------
--bootstrap-server <String: server to    REQUIRED: The server(s) to connect to.
  connect to>
--consumer-property <String:             A mechanism to pass user-defined
  consumer_prop>                           properties in the form key=value to
                                           the consumer.
Hadoop
因为是在本地运行的测试,所以Hadoop以Standalone模式运行即可。因为我之前就已经配置过了Hadoop,这里就不详细写hadoop的配置过程了。详细配置过程可以参考hadoop官方指南
因为Standalone模式,hadoop需要登陆到本机,所以记得将自己的ssh公钥添加到自己机器的authorized_keys中。
下面是其中的部分配置,可以根据自己的路径和情况修改。
hdfs-dfs.xml的相关配置
<configuration>
    <property>
        <name>dfs.replication</name>
        <value>1</value>
    </property>
    <property>
        <name>dfs.data.dir</name>
        <value>/Users/russ/devtools/hadoop-2.9.2/tmp</value>
        <final>true</final>
    </property>
</configuration>
core-site.xml的相关配置
<configuration>
    <property>
        <name>fs.default.name</name>
        <value>hdfs://localhost:9000</value>
    </property>
</configuration>
安装完Hadoop后,启动hadoop。./start-dfs.sh
启动过程中没有报错,jps看到SecondaryNameNode,NameNode,DataNode这样的几个进程就说明hadoop的hdfs功能启动完成了。
36707 SecondaryNameNode
26164 QuorumPeerMain
34822 ConsoleConsumer
34280 ConsoleProducer
33976 Kafka
36780 Jps
33005 Application
36526 NameNode
36607 DataNode
我们可以用hdfs dfs -ls /命令或者访问http://localhost:50070查看hdfs。
flume
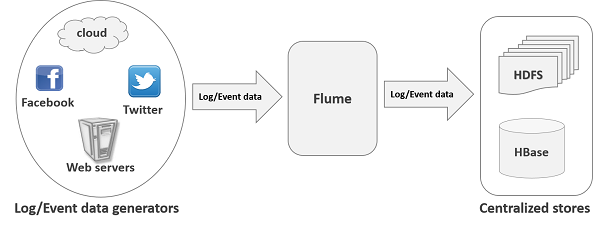
flume是这一期的重点,flume支持采集各种各样的数据源,并将数据保存到一个几种的存储中。而在我们的场景中,flume的source是kafka,sink是hdfs。

配置flume的source和sink,’tier1’是自定义的名字,重点注意tier1.sources.source1.kafka.bootstrap.servers,tier1.sources.source1.kafka.topics,tier1.sinks.sink1.hdfs.path这几个参数的配置。
tier1.sources  = source1
tier1.channels = channel1
tier1.sinks = sink1

tier1.sources.source1.type = org.apache.flume.source.kafka.KafkaSource
tier1.sources.source1.kafka.bootstrap.servers = localhost:9092
tier1.sources.source1.kafka.topics = test_topic
tier1.sources.source1.kafka.consumer.group.id = flume
tier1.sources.source1.channels = channel1
tier1.sources.source1.interceptors = i1
tier1.sources.source1.interceptors.i1.type = timestamp
tier1.sources.source1.kafka.consumer.timeout.ms = 100

tier1.channels.channel1.type = memory
tier1.channels.channel1.capacity = 10000
tier1.channels.channel1.transactionCapacity = 1000

tier1.sinks.sink1.type = hdfs
tier1.sinks.sink1.hdfs.path = hdfs://127.0.0.1:9000/user/hive/warehouse
tier1.sinks.sink1.hdfs.rollInterval = 5
tier1.sinks.sink1.hdfs.rollSize = 0
tier1.sinks.sink1.hdfs.rollCount = 0
tier1.sinks.sink1.hdfs.fileType = DataStream
tier1.sinks.sink1.channel = channel1
启动flume
./bin/flume-ng agent --conf ./conf/ --conf-file ./conf/flume-conf.properties --name tier1 -Dflume.root.logger=INFO,console
在kafka-producer的terminal能随意发送几条消息,在flume这边的控制台可以看到相关部分日志如下:
2019-05-21 17:27:06,756 (hdfs-sink1-call-runner-6) [INFO - org.apache.flume.sink.hdfs.BucketWriter$7.call(BucketWriter.java:681)] Renaming hdfs://127.0.0.1:9000/user/hive/warehouse/FlumeData.1558430821661.tmp to hdfs://127.0.0.1:9000/user/hive/warehouse/FlumeData.1558430821661
2019-05-21 17:27:07,719 (SinkRunner-PollingRunner-DefaultSinkProcessor) [INFO - org.apache.flume.sink.hdfs.HDFSDataStream.configure(HDFSDataStream.java:57)] Serializer = TEXT, UseRawLocalFileSystem = false
2019-05-21 17:27:07,735 (SinkRunner-PollingRunner-DefaultSinkProcessor) [INFO - org.apache.flume.sink.hdfs.BucketWriter.open(BucketWriter.java:246)] Creating hdfs://127.0.0.1:9000/user/hive/warehouse/FlumeData.1558430827720.tmp
2019-05-21 17:27:12,757 (hdfs-sink1-roll-timer-0) [INFO - org.apache.flume.sink.hdfs.HDFSEventSink$1.run(HDFSEventSink.java:393)] Writer callback called.
2019-05-21 17:27:12,776 (hdfs-sink1-roll-timer-0) [INFO - org.apache.flume.sink.hdfs.BucketWriter.doClose(BucketWriter.java:438)] Closing hdfs://127.0.0.1:9000/user/hive/warehouse/FlumeData.1558430827720.tmp
2019-05-21 17:27:12,788 (hdfs-sink1-call-runner-6) [INFO - org.apache.flume.sink.hdfs.BucketWriter$7.call(BucketWriter.java:681)] Renaming hdfs://127.0.0.1:9000/user/hive/warehouse/FlumeData.1558430827720.tmp to hdfs://127.0.0.1:9000/user/hive/warehouse/FlumeData.1558430827720
2019-05-21 17:27:13,757 (SinkRunner-PollingRunner-DefaultSinkProcessor) [INFO - org.apache.flume.sink.hdfs.HDFSDataStream.configure(HDFSDataStream.java:57)] Serializer = TEXT, UseRawLocalFileSystem = false
2019-05-21 17:27:13,774 (SinkRunner-PollingRunner-DefaultSinkProcessor) [INFO - org.apache.flume.sink.hdfs.BucketWriter.open(BucketWriter.java:246)] Creating hdfs://127.0.0.1:9000/user/hive/warehouse/FlumeData.1558430833758.tmp
2019-05-21 17:27:18,798 (hdfs-sink1-roll-timer-0) [INFO - org.apache.flume.sink.hdfs.HDFSEventSink$1.run(HDFSEventSink.java:393)] Writer callback called.
2019-05-21 17:27:18,799 (SinkRunner-PollingRunner-DefaultSinkProcessor) [INFO - org.apache.flume.sink.hdfs.HDFSDataStream.configure(HDFSDataStream.java:57)] Serializer = TEXT, UseRawLocalFileSystem = false
2019-05-21 17:27:18,820 (SinkRunner-PollingRunner-DefaultSinkProcessor) [INFO - org.apache.flume.sink.hdfs.BucketWriter.open(BucketWriter.java:246)] Creating hdfs://127.0.0.1:9000/user/hive/warehouse/FlumeData.1558430838800.tmp
2019-05-21 17:27:18,903 (hdfs-sink1-roll-timer-0) [INFO - org.apache.flume.sink.hdfs.BucketWriter.doClose(BucketWriter.java:438)] Closing hdfs://127.0.0.1:9000/user/hive/warehouse/FlumeData.1558430833758.tmp
通过pig查看hdfs(也可以通过控制台或者访问·http://localhost:5007·确认)内文件:
grunt> ls /user/hive/warehouse
hdfs://localhost:9000/user/hive/warehouse/FlumeData.1558430564172<r 1>	9
hdfs://localhost:9000/user/hive/warehouse/FlumeData.1558430599452<r 1>	5
hdfs://localhost:9000/user/hive/warehouse/FlumeData.1558430791365<r 1>	19
hdfs://localhost:9000/user/hive/warehouse/FlumeData.1558430821661<r 1>	36
hdfs://localhost:9000/user/hive/warehouse/FlumeData.1558430827720<r 1>	21
hdfs://localhost:9000/user/hive/warehouse/FlumeData.1558430833758<r 1>	21
hdfs://localhost:9000/user/hive/warehouse/FlumeData.1558430838800<r 1>	4
将HDFS文件下载到本地,可以看到文件内容确实是刚刚发送的消息。
- 关于flume支持的source和sink可以参考:flume支持的source和sink
- flume集成新版本的kafka可以参考: flume集成新版kafka
- flume的快速开始官方文档: flume quick start